One of iOS 11’s most talked about new features isn’t its new App Store or even its redesigned Control Center. It’s something hidden in your settings that Apple didn’t really mention during its recent iPhone X and WWDC keynotes. With iOS 11, you can perform screen recording with the press of a button—and it works the same way now with iOS 12.
Previously, recording your iPhone’s screen required tethering it to your Mac and loading up Quicktime. Now you can record your phone’s screen any moment you’d like.
How to use screen recording in iOS 11 and iOS 12
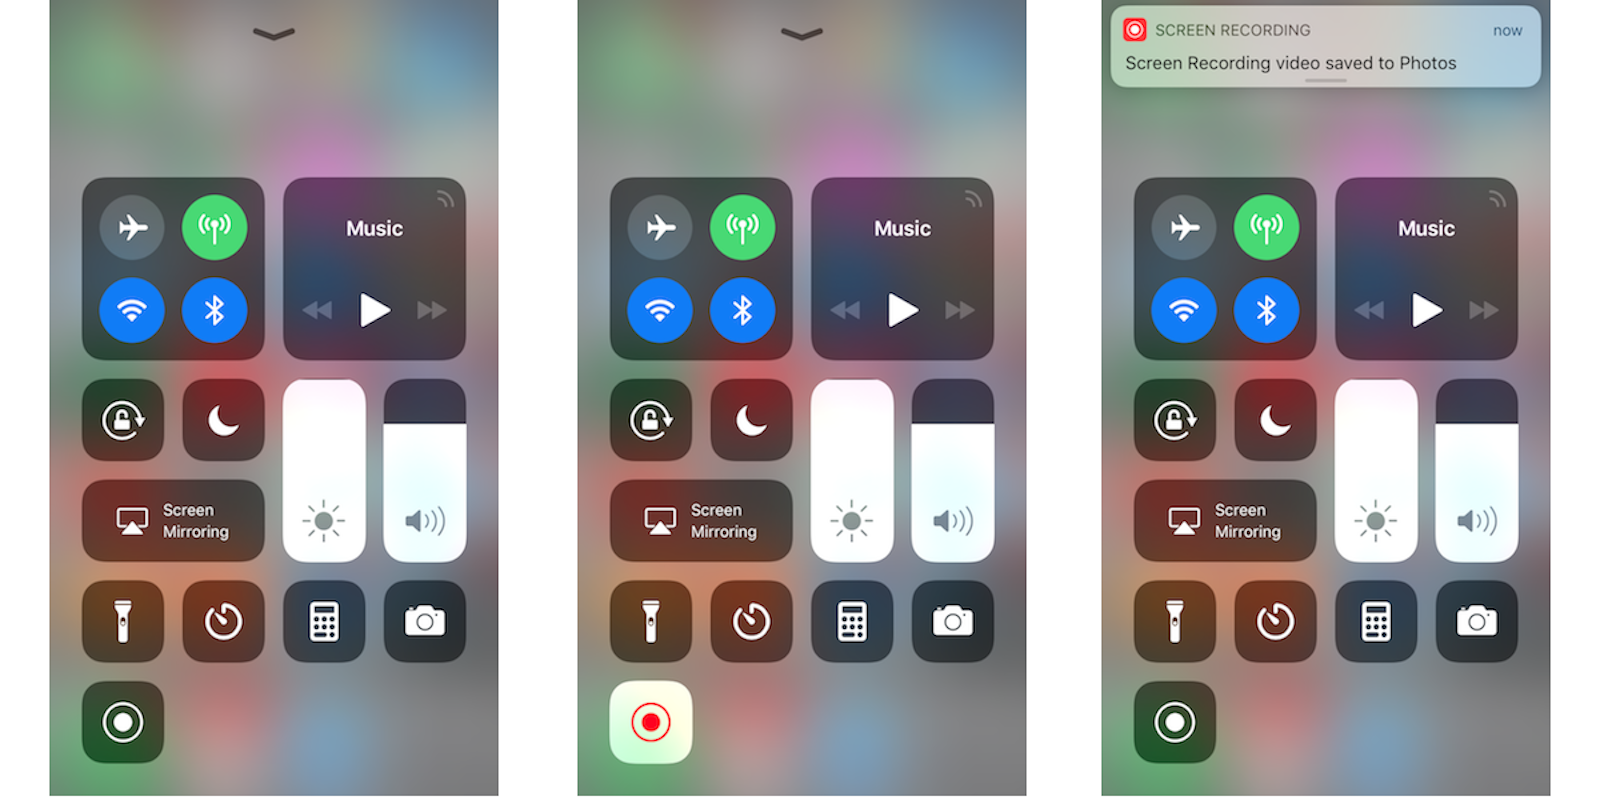
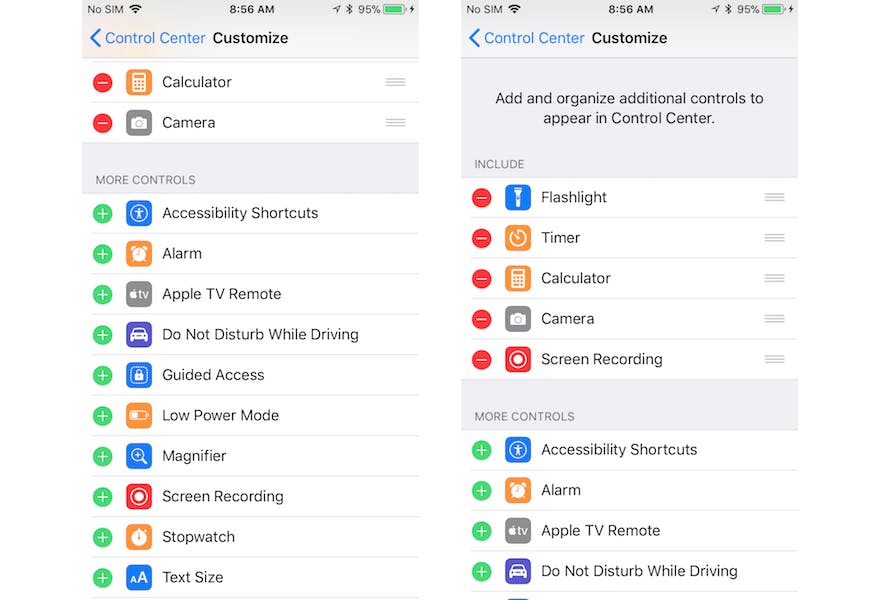
Screen recording is easy to use, but you’ll need to add it to Control Center first before you can access it. To do this, head to your Settings, then Control Center. Scroll down, then tap the green plus sign next to Screen Recording to add it to your Control Center screen.
Now you can exit your Settings menu. Swipe upwards from the bottom of your screen to pull up Control Center, and you’ll now see the Screen Recording icon juxtaposed among your other Control Center options. (The icon is a small white circle ringed by another circle, similar to a camera shutter icon.) Then, just tap that button to begin recording what’s on your screen.
READ MORE:
- What is a good internet speed, really?
- 5 free fax services that will help you fax online in seconds
- Free reverse phone lookup with Google: How it works
How to add audio to your screen recordings in iOS 12
Normally, these recordings won’t include sound. If you want to include audio from your phone’s mic—for example, if you want to narrate a how-to video—use Touch ID to force press on the screen recording icon. Then tap the red Microphone Audio icon at the bottom of the screen. Now, you’ll record your screen, as well as the audio from and around your iPhone.
How to use screen recording on Snapchat
The buzz on social media is that now you can secretly record Snapchats, Instagram Stories, and direct messages, and other ephemeral messages without the other person knowing. However, in Snapchat’s case, that’s not true. If you try to use screen recording to secretly record on Snapchat, the app will still notify you that your snap has been screengrabbed. As of publishing time, you can record private messages sent on Instagram without alerting the sender.
This feature is useful for far more than just creeping on private messages. If a friend or family member is having an issue, once they’ve learned how to do a screen recording, they can record the problem they’re having. Then they can send it to you, and you can more easily troubleshoot it. You can also use the feature to record how-to videos of your own.
You can also use it to show cool things you’re seeing on your phone. For example, one Twitter user employed it to share their augmented reality app experience. You can use it to record gameplay. You can also use it to record live video streaming on your device. We’ll have to see how sports organizations such as the NFL and the Olympics handle this newfound freedom viewers have at their disposal. Sharing clips from games and turning them into GIFs will now be easier than ever. With a hundred different apps you can share those clips over, it will be difficult for these organizations to police these videos.
READ MORE:
- Snapchat Trophies: How to get them and what they mean
- How to follow celebrities on Snapchat
- How to save Snapchat videos
Pro tips for screen recording on iOS 12
Before sharing your videos, you may want to edit them slightly in the Photos app. Namely, you’ll likely want to trim the few seconds at the beginning and end where you’re navigating to and from Control Center.
Depending on what you’re screen-recording, you may also want to turn off push notifications before you hit that record button. You can quickly head into your settings (or Control Center) and set your phone to Do Not Disturb or Airplane Mode to prevent notifications from popping up during your recording.

