Email is the worst. If you leave your inbox unattended even for a single day, you can find yourself being slammed by a hundred irrelevant messages with the few personal notes from people you actually care about nowhere in sight.
Normally, I’d recommend the tried-and-true method of Select All, Delete All for problems like this, but it’s really not a responsible solution—especially if email is theoretically the easiest way to reach you online.
If you happen to maintain a Gmail account (or five—who’s counting?) and are not quite ready to make the switch to Google Inbox, here is how to set up your Gmail account in the most efficient way possible.
1) Labels and filters are your friends
Tagging your emails is the smartest thing you can ever do in Gmail, making things way easier to find in the black hole that is your inbox.
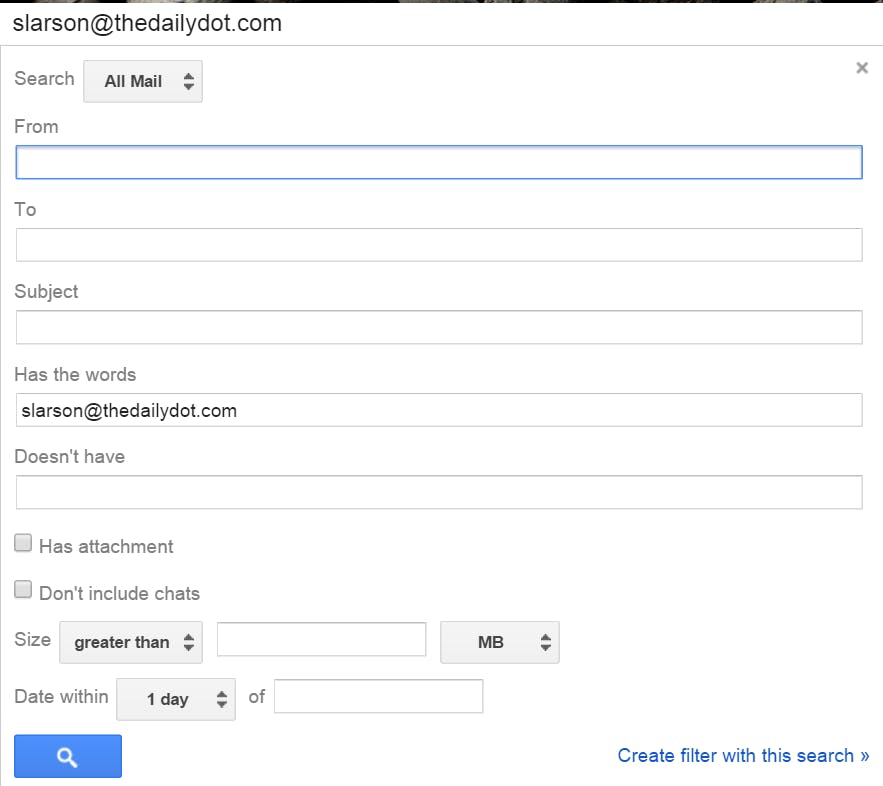
A quick way to get started on a labeling spree is by creating a filter that will automate tagging for future messages. Pick a person whose emails you regularly receive, enter their email address into the search bar, then hit Enter or the magnifying glass button. Doing so should yield all the Gmail threads and conversations that person has been a part of.
Click on the drop-down arrow to show search options.
As a default, the email address you entered will show up under the “has the words” field.
This should cover all messages that mention the email address. If you’d like to specifically label emails sent or addressed to the specified email address, move the email address into the “from” or “to” fields respectively. Click on “Create filter with this search” to proceed.
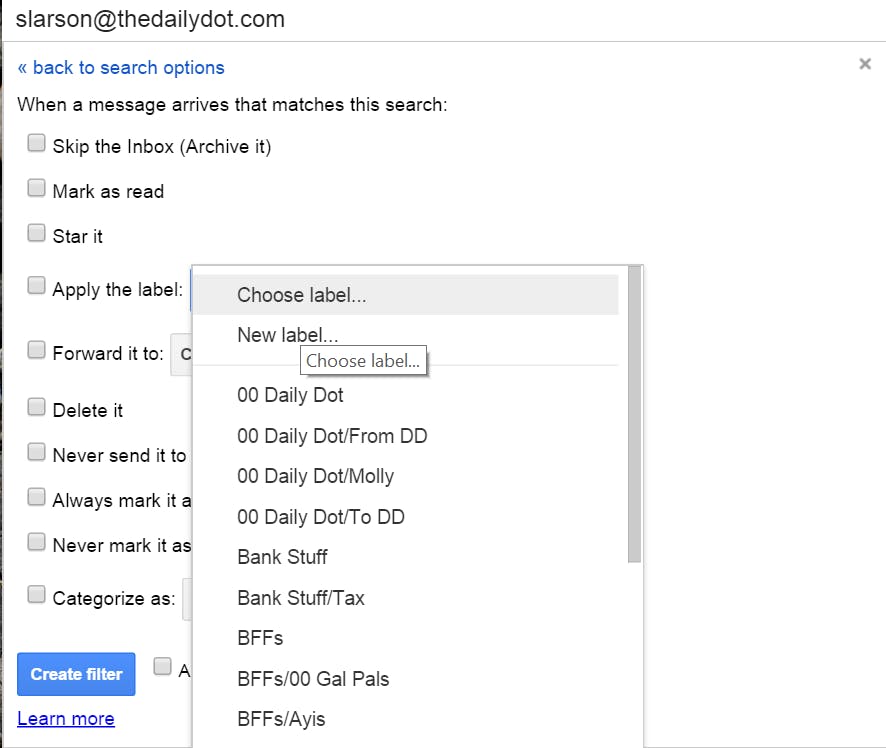
Check the option “Apply the label” then click on “Choose label” to create a new one. Once you have a set of starter labels created, you can decide to use them in future filters you define.
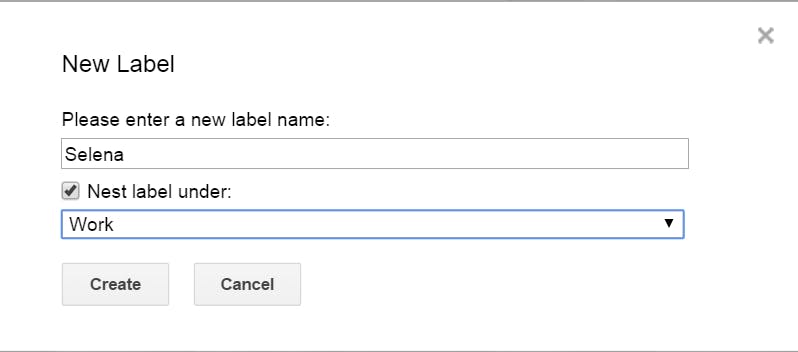
An additional practice you should adopt—since you’re on the road to going label-crazy, anyway—is nesting labels, which basically means specific labels that get filed underneath broader general labels. It’s very useful for grouping similar emails together and makes for a more organized Gmail sidebar. If your email address gets more than 50 messages a day, this will definitely help you cut the fat on your inbox and get to what’s important a lot quicker.
Make sure you check the box that says “Also apply filter to [x] matching conversations” before creating the filter so the emails that fulfill your search parameters automatically get the new label you just created.
2) Use Categories
Just in case you’re still rocking the old-style Gmail and are not aware of the service’s new tabbed system, there are five categories the newer version of Gmail uses to classify your messages:
Primary, for person-to-person conversations that don’t appear in other tabs.
Social, for messages from social networks, media-sharing sites, and other social platforms.
Promotions, for deals, offers, and marketing emails.
Updates, for personal and auto-generated emails including receipts, confirmations, bills, and other statements.
Forums, for messages from online groups, mailing lists, and discussion boards.
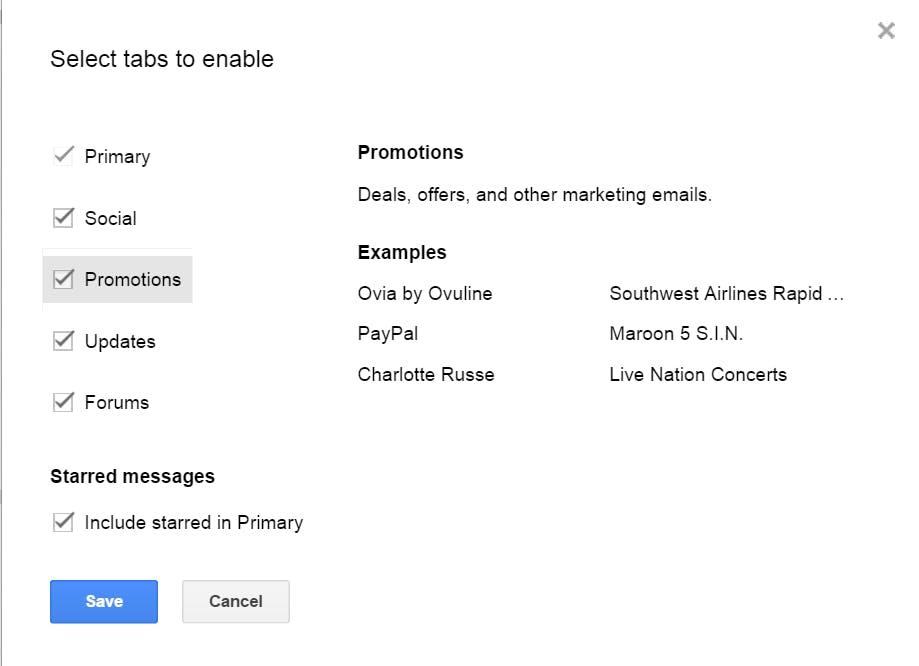
These categories—once you get used to using them—are actually helpful if you’re looking for a particular email and would like to get in and out of your inbox quickly. To enable, click on Settings (aka the gear icon on the top-right corner of the screen) and go to “Configure Inbox.”
It will bring up a window where you can choose which of the categories you’d like to enable. Try hovering over each one to see a quick explanation of the tab and some example emails that would fall under it.
Primary is the only tab that cannot be deselected because that’s where all the uncategorized emails go. You have an added option of including starred emails in the Primary category as well.
If you’re not liking the feature, deselect all the categories to go back to the old inbox view.
3) Use stars
Clicking on the star icon next to your emails will help you bookmark important messages (both sent and received), which you can quickly access under “Starred” in your sidebar.
4) Find the inbox view that fits you
Logging into your email can be a daunting task, especially if you haven’t been there in a while. Make sure you enable a view that is easiest on your eyes. Click on the gear icon on the top-right corner of the screen again and give the three available options (Comfortable, Cozy, or Compact) a test drive.
5) Maximize your page
For someone who rarely deletes emails, there’s nothing more annoying than having to keep clicking the Next arrow to get to older messages. Do yourself a solid and enable the maximum number of emails displayed per page. Click on the gear icon and go to Settings. Under maximum page size, choose a high number you’re comfortable with.
6) Use personal indicators and snippets
While you’re still in the Settings page, you might as well enable a few of the more useful options available to you. Enabling personal indicators will mark emails sent to your address as well as other people with an arrow ( › ) and messages sent only to you with a double arrow ( » ). Snippets will give you a quick preview of what’s inside an email, rather than displaying just the subject.
7) Explore the Labs section
Gmail’s Labs is where they keep all the nifty little add-ons that were created to work with Gmail. While most of these features are experimental and may change, break, or disappear at any time, some of the more useful ones are still up and running and may give your email the overhaul it needs. Click on the gear icon and go to Settings where you can find the Labs tab.
On this page you can search for any lab you can think of to see if it exists. Here are some of the more useful ones:
Undo Send: It gives you a chance to take back a message after you’ve clicked on the Send button. (See item #8 on this list for more information on this Lab.)
Google Maps previews in mail: Shows you the map view of any address mentioned inside an email.
Google Calendar gadget: You can immediately see any appointments or events you have in your calendar on the side panel.
Mark as Read button: Now you can quickly diminish your list of unread messages with a simple click.
8) Gift yourself the power of the Undo.
Another annoying (and sometimes dangerous) occurrence in the realm of email is accidentally sending a message you’re not ready to send (or are not supposed to send). This mishap can be easily avoided by clicking on the gear icon and going into Settings, where you can check the Undo Send option. You can set the cancellation period to as little as 5 seconds, but go ahead and opt for the max of 30 seconds. You’ll thank us later.
9) Know the search bar shortcuts.
This is probably the most important tip out of all the tips mentioned in this list. Knowing how to navigate through Gmail’s search function like a boss will help you locate the emails you need.
Using a keyword you know is mentioned in an email you are looking for works, sure, but Gmail has a list of shortcuts that are more effective. Type these phrases in your account’s search bar and test them yourselves:
- to:(name or email address) will pull up all the email you’ve sent to the email address
- from:(name or email address) will pull up all the email you’ve received from the email address
- label:(label name) will pull up all the emails under that particular label
- is:unread will pull up all the emails you have not yet read, including old emails you may have forgotten to get to in the past
- is:starred will pull up all emails you have marked with a star
- category:(category name) will pull up all emails under that particular category
- has:attachment will pull up all emails that have a file attached to it
You can even combine them to yield a more accurate search result.
- category:(category name) is:unread will provide you with a list of unread messages under a particular category
- label:(label name) has:attachment will show you a list of messages under a particular label that happens to have a file attached to them
Those are only some of the many available advanced search operators you can start using. The list includes options for messages marked with a particular star as well as options for specifying a time range, among other things.
10) Install helpful apps
Third-party apps for Gmail are often designed to boost the usefulness of your email account. They feature uses and options you didn’t even know you wanted or needed. Here are a few examples:
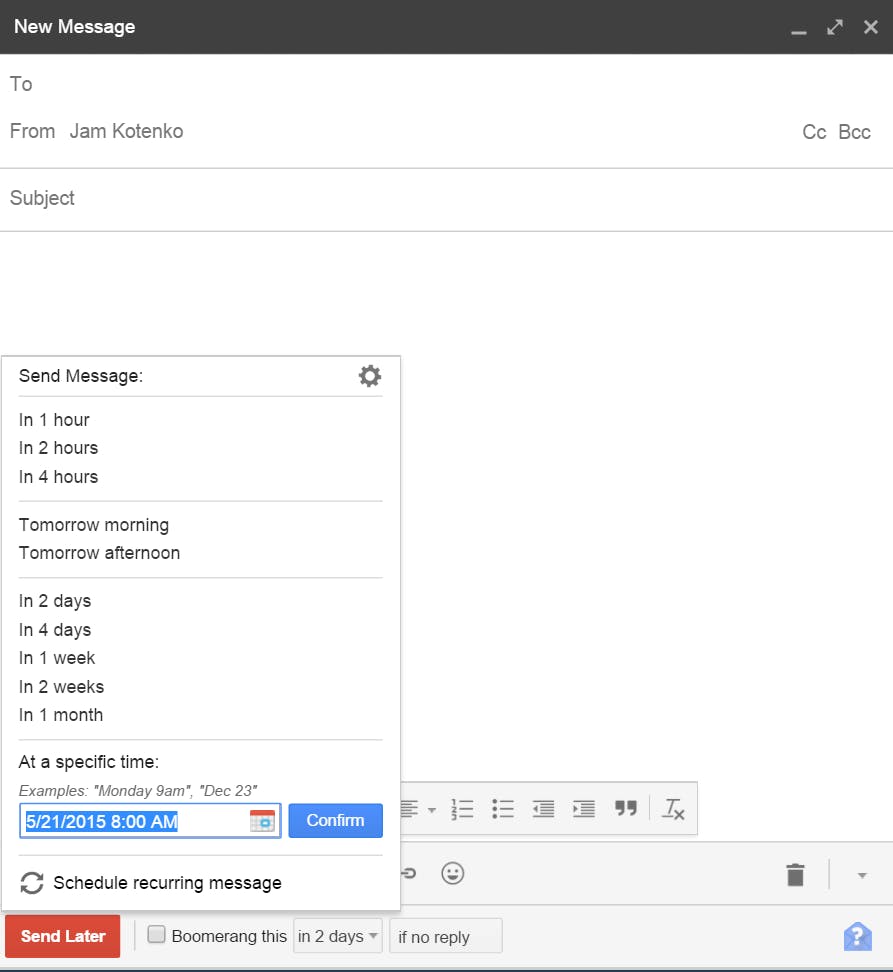
Boomerang Gmail: This app allows you to schedule an email to be sent at a later time.
It also lets you keep track of important messages you’re not necessarily ready to read right now–it archives the email and “boomerangs” it back into your inbox as a new and unread email, on a date and time you specify.
For people who regularly send emails that require a response, Boomerang also gives you a heads up when you haven’t heard back from a person you’ve contacted, giving you the opportunity to stay on top of your tasks and send that follow-up email when it’s appropriate.
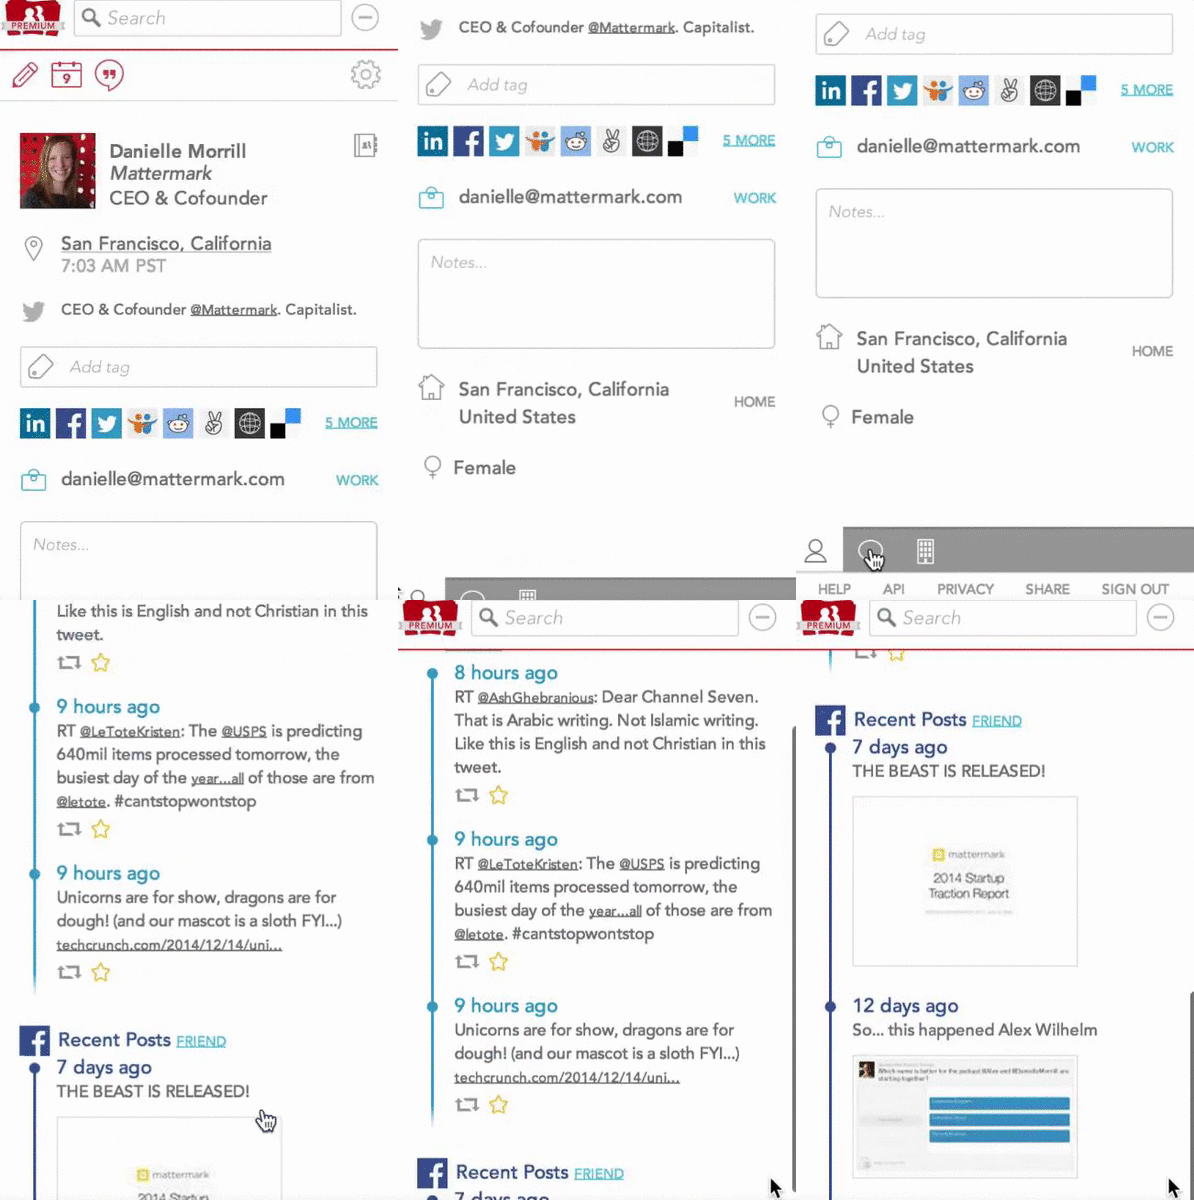
FullContact for Gmail: This Chrome extension will give you a quick summary of a person’s online presence beside an email they are mentioned in. You can also take a gander at the person’s social media activity, all in a glance within Gmail.
Installing this app will help you be better prepared when you need to write the person an email, or even meet them in person.
KeyRocket for Gmail: Quickly learn all the Gmail shortcuts. It’s as simple as that.
Now that you know all of the tricks, it should be a breeze to set up your Gmail account for optimal sanity and success. If you have any additional tricks, do let us know in the comments—a little crowdsourced inbox wisdom goes a long way.
Illustration by Jason Reed

